This fun fold card was inspired by our July Paper Pumpkin Kit. It too, had a three panel fold design. My design is a bit different. I really did not want to add another piece of paper to this one, so I figured out a way to utilize the 11 inch length on a standard piece of cardstock.
This paper and Bundle has so many possibilities, it is mind boggling. While the colors, pink and blue are not traditional, I am drawn to the patterns and colors, which I find surprising. Also, there are several designs that really are in more traditional colors and patterns.
This first Picture has the DSP covering the entire front of the card. The second only has the DSP in the center panel and down one side. I prefer the second version with limited DSP on the front. Your comments on my YouTube Channel suggest that you agree.
Here is a picture of the second Fold with the two Christmas Trees. I just love the garland, what fun!
This last Picture shows the entire inside of the card with the additional DSP and the green trees.
I had fun with this design and I love the papers and this bundle. You will have to let me know what you think.
Pieces:
• Mossy Meadow Base 5 1/5” by 11”, Scored at 4” and 8 ¼”, plus scrap for inside trees and sentiment backing
• Basic White – for the inside of the card 5 ¼” by 4”, plus scrap for the two sentiments and the Middle panel Christmas Trees.
• DSP, Whimsey and Wonder 12 by 12 SDSP, Small Green Holly pattern 3 ¾” by 4 ½” for the middle panel of the Card and a strip of the same pattern ½” by 5 ½”. 1 piece of the Holly Design (white background) 2 ½” by 5 ¼” for the inside of the card
It is time for our second Sale-A-Bration this year and the launch of the much anticipated July to December Catalog! This catalog is chock full of Holiday, Christmas, Halloween, and Thanksgiving projects.
The Catalog is great and the free products are even better. Let me know if you don’t have catalogs I would be happy to send some to you.
This is a ‘Tower Pin Wheel Card’, I made mine a Christmas Card. This is the front of the card. One version says Seasons Blessings and the second says Merry Christmas. The card made with these dimensions fits in a regular envelope and can be more or less elaborate depending on how you decorate the panel.
This is the front of the card made in the video.
This is the second panel. The DSP used for this project is some of the free paper from Sale-A-Bration.
The Third panel is all about trees.
The fourth and last panel uses the Holly Punch and the Noel Sentiment.
What a fun project! You can leave one of the panels free of decorations for a hand written sentiment.
Measurements and Supplies for Today’s Fun Fold Pin Wheel Card
Cased from Kathy Howes, Be Creative With Kathy
Pieces:
• Basic White – 4 @ 2 ¾” by 4 ¼, 1 @ 2 ¼” by 3 ¾”, Scrap for Noel Sentiment and Merry Sentiment
• Garden Green – strip at least 1 ¼” Wide and 4” long to cut Holly strip. Second strip to use with tree border cut 8-9 trees Save a few green Holly Leaves for the first panel
• Real Red – 1 @ 2 ½” by 4”, scrap to back NOEL sentiment and Merry Sentiment, plus scrap to cud red “berries” for Holly
• DSP Deer Piece2 ¼” by 3 ¾”, scrap for to red plaid trees 1 red plaid mat for first panel 2 ½” by 4”, for Tower 1 piece Tree Paper 4 ¼” by 4 ½”, 1 piece 2 ½” by 4”, 4 pieces 1 ½” by 4”, two red plaid and two green dots (the back of the tree paper)
• Other, Red Ruffled Ribbon, Red Rhinestones, Basic Rhinestones
Thanks for stopping by and let me know if you have questions.
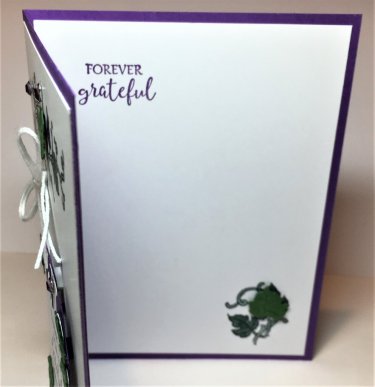
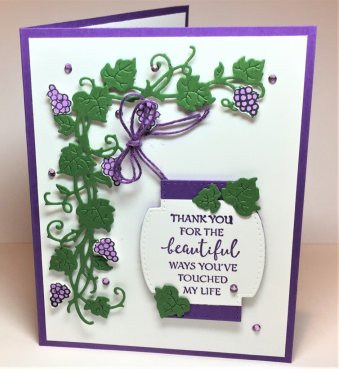
Forever Grapevine, what a fun project. Here are the three cards, Simple, Stepped Up, and Stepped Up plus.
Measurements and Supplies for Today’s Simple to Simply Stunning Forever Grapevine Card:
I used a Gorgeous Grape Card Base 8 ½” by 5 ½” , scored and folded at 4 ¼”
There are two pieces of Basic White 4” by 5 ¼”
Also, Scrap in Basic White, Gorgeous Grape and Garden Green for the sentiment and grape leaves
The First Card below is stamped in Garden Green Ink and is on a Garden Green Cardstock A2 Base, 8 1/2″ by 5 1/2″, scored and folded at 4 1/4″. The only coloring is the Grapes which can be accomplished with whatever coloring tools you have.
Markers
Watercolor Pencils
Ink and a Blender Pen
I added Green Rhinestones from our Holiday Rhinestones to embellish the card along with White Bakers Twine, to add a bow. I then used my trimmer to add score lines at 1/4 inch around the front white panes and three vertical score lines to the right side of the inside white pane.
The second Card is on a Gorgeous Grape A2 Card 8 1/2″ by 5 1/2″, scored and folded at 4 1/4″. On this one I colored the leaves and vines with my Soft Succulent Alcohol Blends and and the Highland Heather Dark blend to color the grapes. I used the dies in the bundle to cut out a few individual leaves out of Garden Green to add randomly to the vine, the inside and the sentiment label. I also colored some Basic Rhinestones with my dark Highland Heather blends to get purple rhinestones for the project .
For the last card I used dies to cut the vine detail and the individual leaves from Garden Green Cardstock. I then stamped the image again on a piece of scrap white and colored and fussy cut the grapes so that I could add them to the vine with dimensionals, as well as to the inside of the card. I used my Dark Highland Heather Blend to color some of the White Bakers Twine to add the Purple bow to the front of the card. I used the Stitched So Sweetly dies for my sentiments on the front and inside of the card.
I hadn’t done one of these Simple to Simply Stunning projects in a while and it was fun to do! I think I like the second card the best.
Thanks so much for stopping by. Let me know if you have questions.
This Paper Pumpkin Kit is one of my all time favorites. And the envelopes turn this into an exceptional value. I used all parts of these envelopes to extend by card making supplies.
Measurements and Supplies for Today’s July 2021 Paper Pumpkin Alternatives
All Bases were standard size 8 ½” by 5 ½” , scored and folded at 4 ¼”
In addition to the kit supplies I used Soft Seafoam, Mint Macaron and Evening Evergreen Cardstock
Genial Gems and 2021 – 2023 In Color Gems, and Champaign Rhinestones
This kit was lots of fun to put together. The suggested designs were also very attractive. I think with a little imagination and a variety of card designs you could make 25 or 30 cards from these supplies. Thanks so much for stopping by let me know if you have questions.
This is one of the first Christmas Cards of the Season. I made this one for a team swap. After this video was finished I added a bit of Colored Ribbon right at the top of the sentiment along with a knot bow in the new white organdy ribbon, I used my Mossy Meadow Blend to color the ribbon. Here is a picture of the final card with the colored ribbon. The Ribbon Addition to this one adds a great final touch to make this one feel complete.
Using a bit of ink across an embossed image is one of the simplest ways to get a dramatic effect for a card background. I love this one with the splash of red.
Supplies:
Following are the Measurements and supplies for this Christmas Card.
Mossy Meadow 8-1/2″ X 11″ Cardstock, scored and folded at 4 1/4″
I used 2 Basic White panels, the first for the front of the card is 4 1/2″ by 3 1/4″. The second White Panel measures 4 3/4″ by 3 1/2″ for the inside of the card, plus a small piece of scrap for the sentiment on the front of the card.
I used a small piece of Real Red to stamp and cut out the bird for the front of the card
4 pieces of Whimsey and Wonder DSP 2″ by 1 1/2″ , two each for the front and the inside of the card
Thanks so much for stopping by. Let me know if you have questions.
Product List
Mossy Meadow 8-1/2″ X 11″ Cardstock [133676] $8.75 –– https://bit.ly/3iMUvkU
Basic White 8 1/2″ X 11″ Cardstock [159276] $9.75 –– https://bit.ly/3bUDgg3
Red Rhinestone Basic Jewels [146924] $7.00 –– https://bit.ly/3j3Xcyj
Mossy Meadow Classic Stampin’ Pad [147111] $7.50 –– https://bit.ly/2DZHeqr
Tuxedo Black Memento Ink Pad [132708] $6.00 –– https://bit.ly/3nQphNn
The following are available after August 3, 2021
• Beauty of Tomorrow Stamp Set ––
• Whimsey and Wonder 12 X 12 SDSP ––
My name is Linda Bedinger and welcome to Ink and Ingenuity. I'm excited to share my love of Stampin' Up! with you!
Current Catalogs
2019 Beginner’s Catalog
Achievements
Archives
Categories
Disclaimer
The content in this blog is the sole responsibility of Linda Bedinger as a Stampin’ Up!® Independent Demonstrator. The use of and content of classes, services or products offered is not endorsed by Stampin’ Up!


 Specialty Designer Series Paper")
")

")


 Specialty Designer Series Paper")
 Mini Ruffled Ribbon")


")
")
")


")


